
[Spring] 스프링 부트 첫걸음 2
: Android앱 REST API 서버 만들기 2 (PUT요청, @RequestParam, Postman)
** 해당 글은 하단 참고란의 영상을 보고 따라서 공부하며 기록한 글입니다.
이전글과 이어집니다.
[Spring] 스프링 부트 첫걸음 : Android앱 REST API 서버 만들기 1
** 해당 글은 하단 참고란의 영상을 보고 따라서 공부하며 기록한 글입니다. IDE 준비 Eclipse STS : Sping.io 사이트에서 Projects > Spring Tools 4 다운받아 설치(https://spring.io/tools) Spring Tools 4 is..
onedaythreecoding.tistory.com
이전글에서
GET으로 데이터 조회기능을 만들어봤으니
POST으로 데이터 생성기능을 만들어보자.
api 서버 코드 작성하기 - PUT(생성)
정보를 생성하는 api를 작성해보자
- @PostMapping 어노테이션을 단 api함수인 postUserProfile함수를 작성한다.
@GetMapping 함수들 아래에 아래 코드를 추가한다.
	@PostMapping("/user/{id}")
	public void postUserProfile(@PathVariable("id") String id, @RequestParam("name") String name, @RequestParam("phone") String phone, @RequestParam("address") String address) {
		UserProfile userProfile = new UserProfile(id, name, phone, address);
		userMap.put(id, userProfile);
	}
get, post등 프로토콜이 다르면 path는 GET요청 중 getUserProfile의 path와 같아도 된다! 똑같이 사용하자.
통상적으로 Path에는 id와 같은 한두가지 파라미터 전달만 사용한다.
대신 RequestParam을 사용해 http프로토콜의 파라미터로 전달한다.
이 메서드의 인자로 id, name, phone, address변수를 받을 거고,
id는 path에, 나머지는 http파라미터에 담아 보내도록 하자.
POST요청 테스트하기 - Postman
RequestParam이 있는 요청은 크롬 브라우저 등의 브라우저로 테스트할 수 없다.
이 때 테스트용으로 사용하는 프로그램을 Rest API Client라고 부른다.
많이 사용되는 Postman을 사용해서 테스트하자. 사용법을 알려주는 글들은 많이 나온다. 쉽다.
회원가입 후 나는 윈도우 어플리케이션도 다운 받았다.
Postman API Platform | Sign Up for Free
Postman is an API platform for building and using APIs. Postman simplifies each step of the API lifecycle and streamlines collaboration so you can create better APIs—faster.
www.postman.com
Postman에 아래와 같이 파라미터값을 넣어서 요청을 보내 테스트해볼 수 있다.
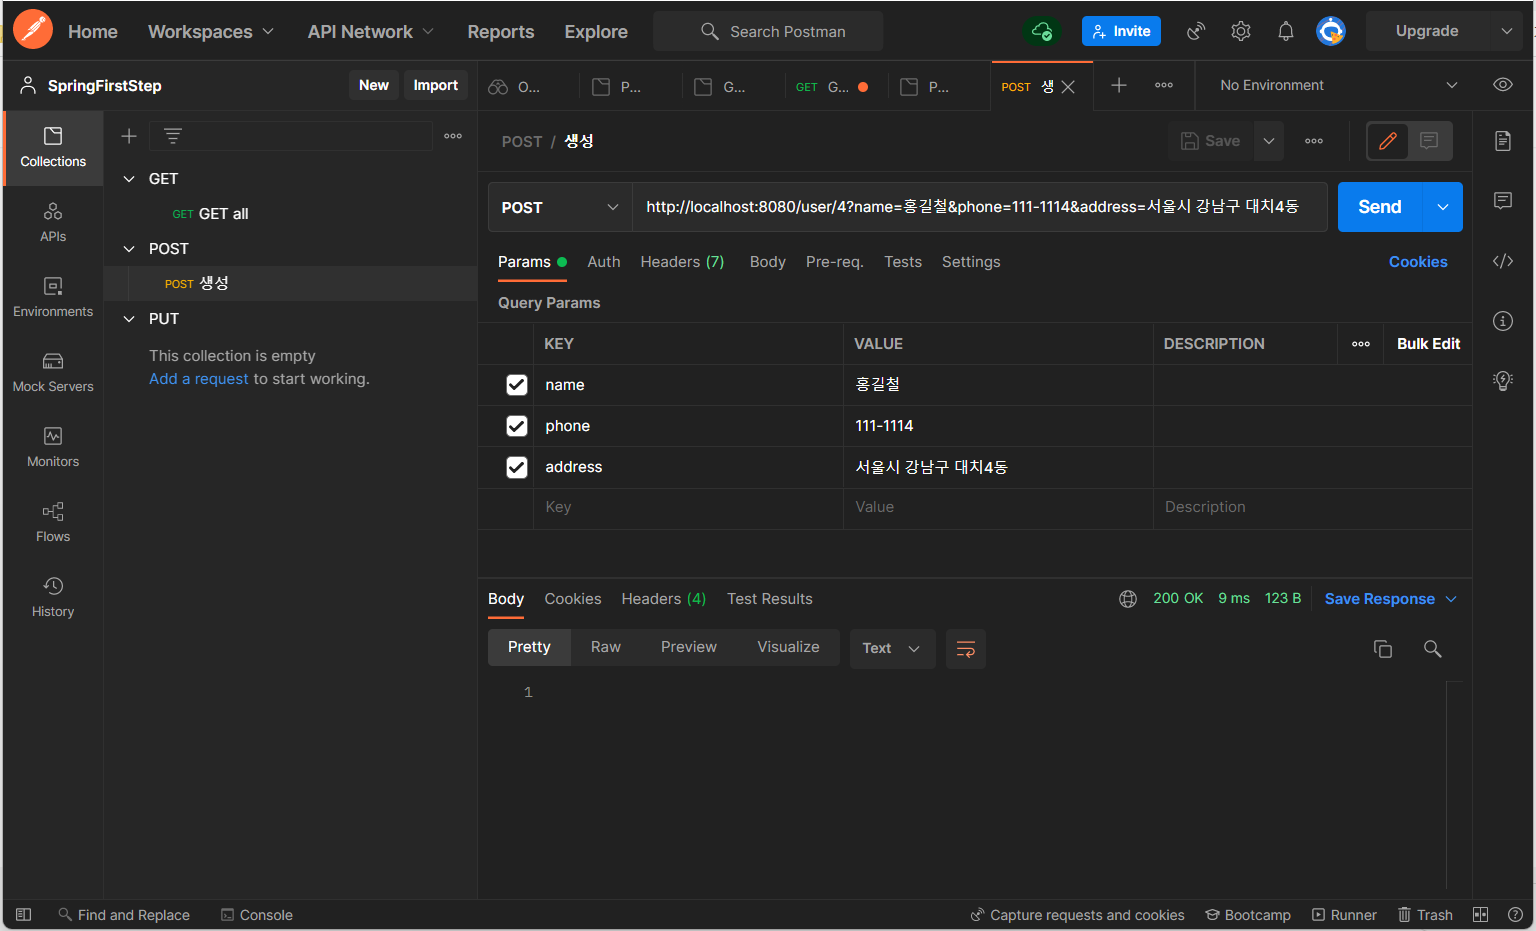
url창에는 id값만 즉 user/4까지만 입력하고
아래 Query Params에 값 3개를 입력한다.
Send를 누르면 요청되고
아래에 초록색으로 200 OK가 뜨면 성공이다.
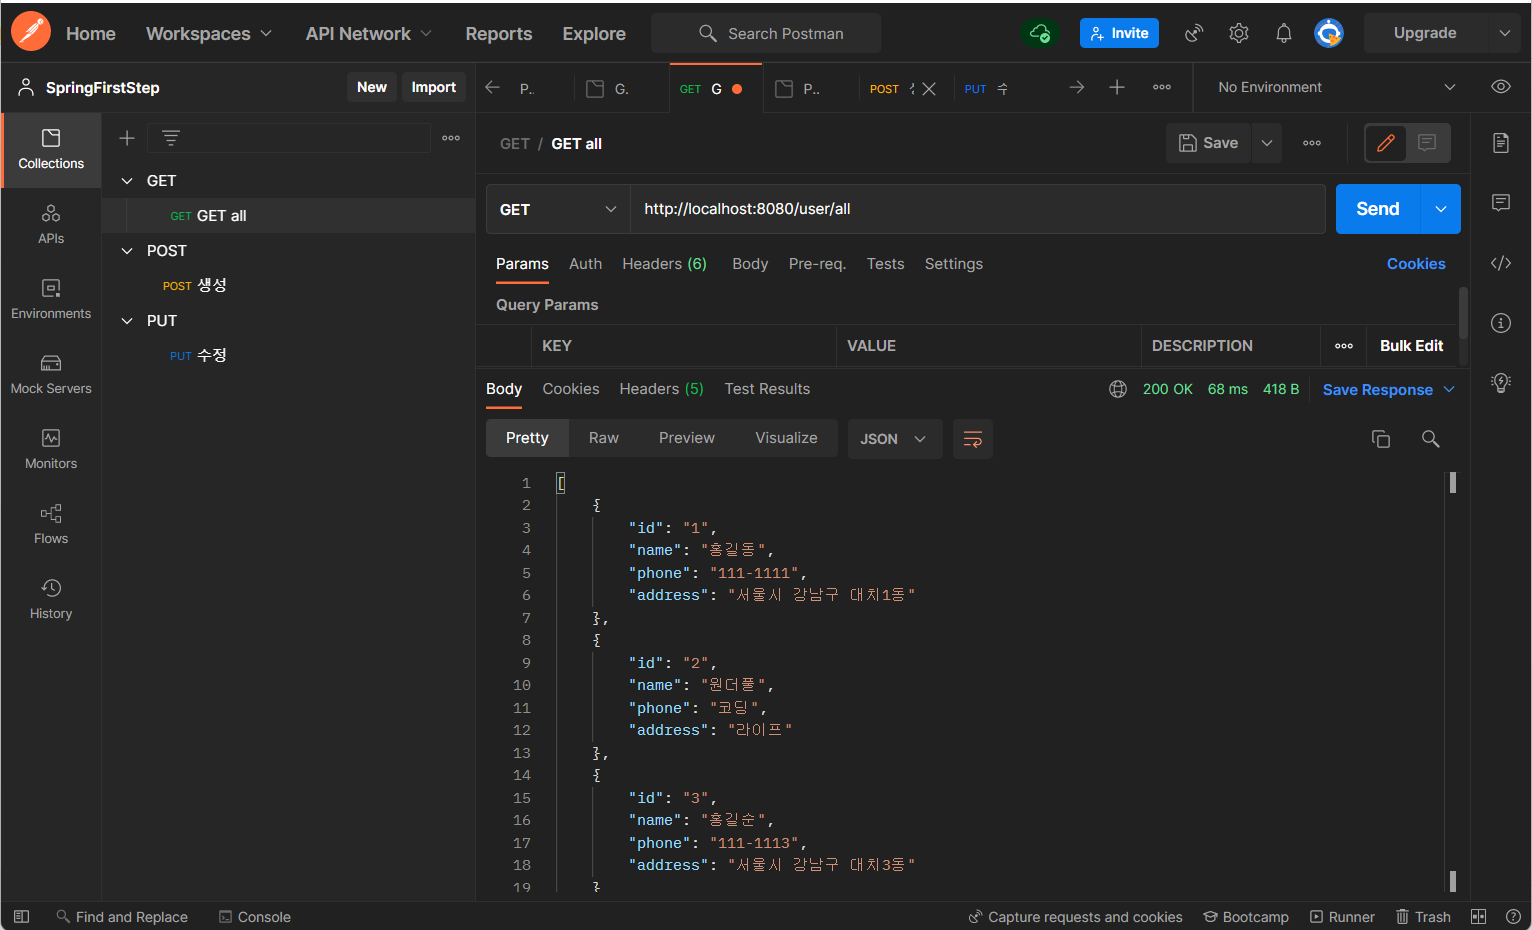
추가한 데이터는 돌고 있는 서버에 저장되어서
GET요청으로 확인하면 확인이 된다!
이전 글에서 만들었던 /user/all로 확인해보자.

4번 회원이 잘 추가되어있다.
이제 PUT으로 수정기능을 만들어보자.
api 서버 코드 작성하기 - PUT(수정)
- @PutMapping 어노테이션을 단 api함수인 putUserProfile함수를 작성한다.
아래 코드를 추가한다.
	@PutMapping("/user/{id}")
	public void putUserProfile(@PathVariable("id") String id, @RequestParam("name") String name, @RequestParam("phone") String phone, @RequestParam("address") String address) {
		UserProfile userProfile = userMap.get(id);
		userProfile.setName(name);
		userProfile.setPhone(phone);
		userProfile.setAddress(address);
}수정이므로 id값을 이용해 수정할 대상을 찾은 다음 Setter들을 활용했다.
테스트해보자
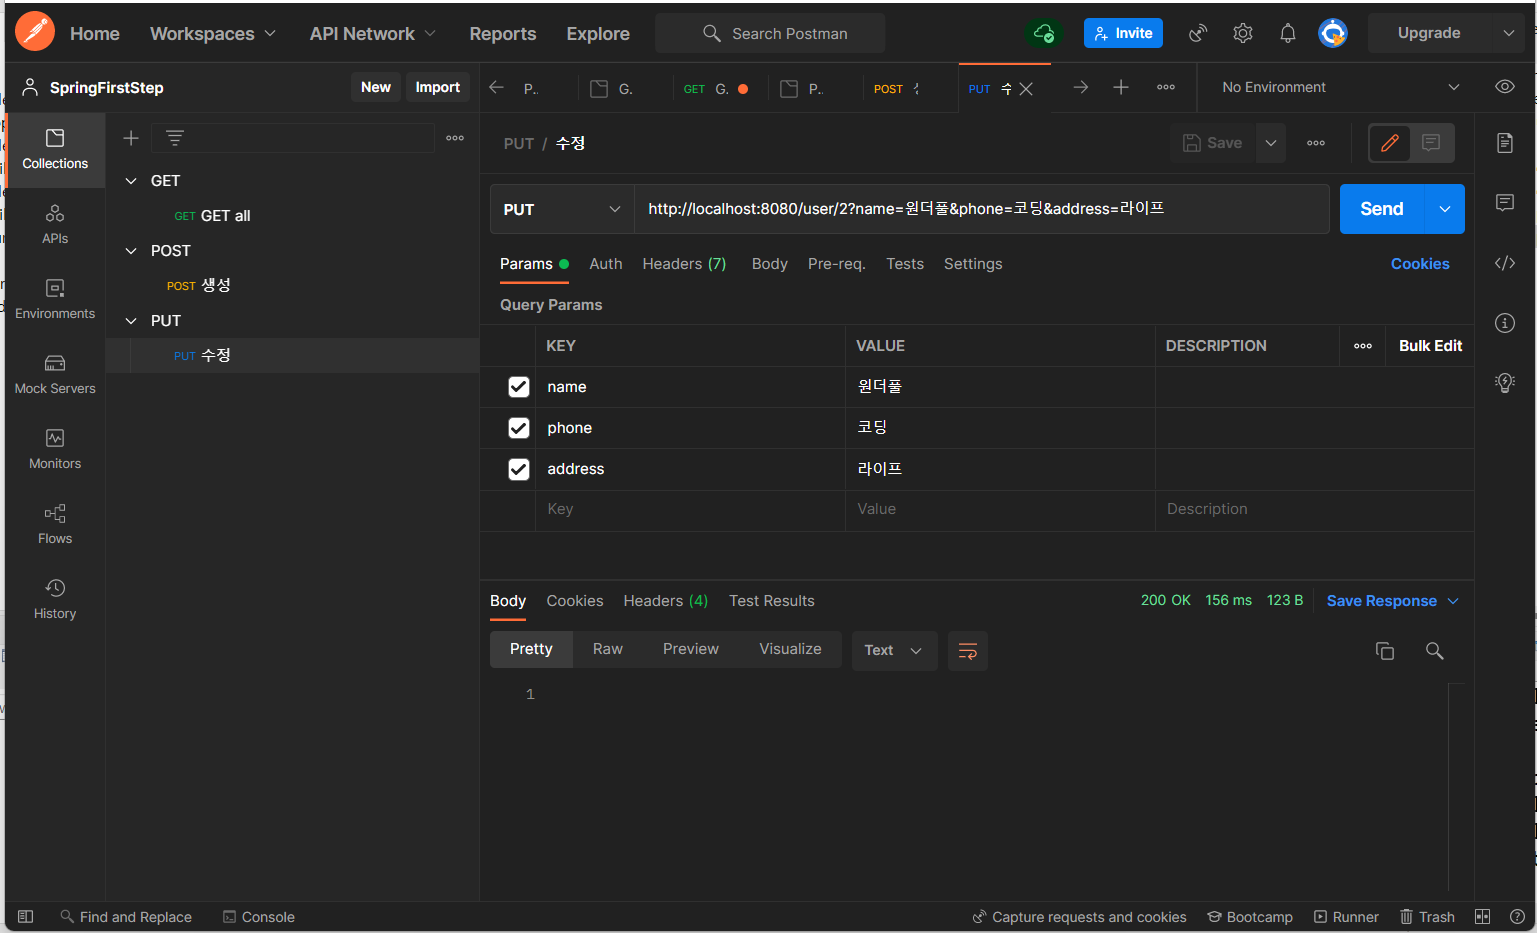
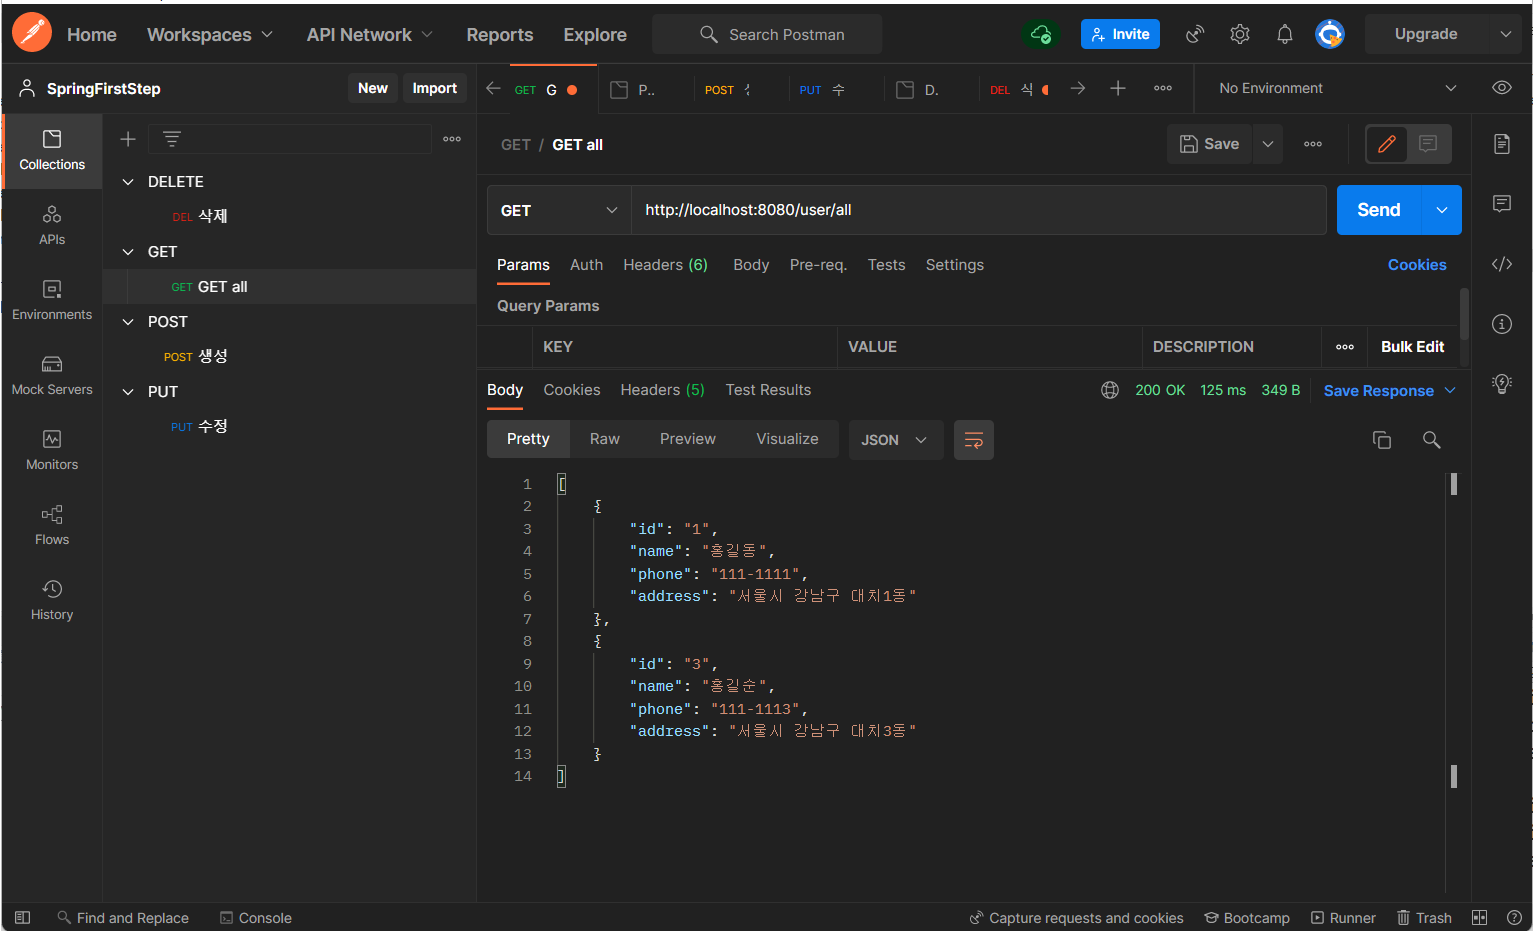
200 OK떴다. GET으로 확인해보면
두번째 회원정보가 잘 바뀌어있다.
참고로 서버를 껐다 켰으므로 POST로 추가했던 데이터는 사라져있다.
마지막 삭제기능을 만들어보자.
api 서버 코드 작성하기 - DELETE(삭제)
- @DeleteMapping 어노테이션을 단 api함수인 deleteUserProfile함수를 작성한다.
아래 코드를 추가한다.
	@DeleteMapping("/user/{id}")
	public void deleteUserProfile(@PathVariable("id") String id) {
		userMap.remove(id);
}remove()메서드를 활용한다.
서버 껐다키고 테스트해본다.
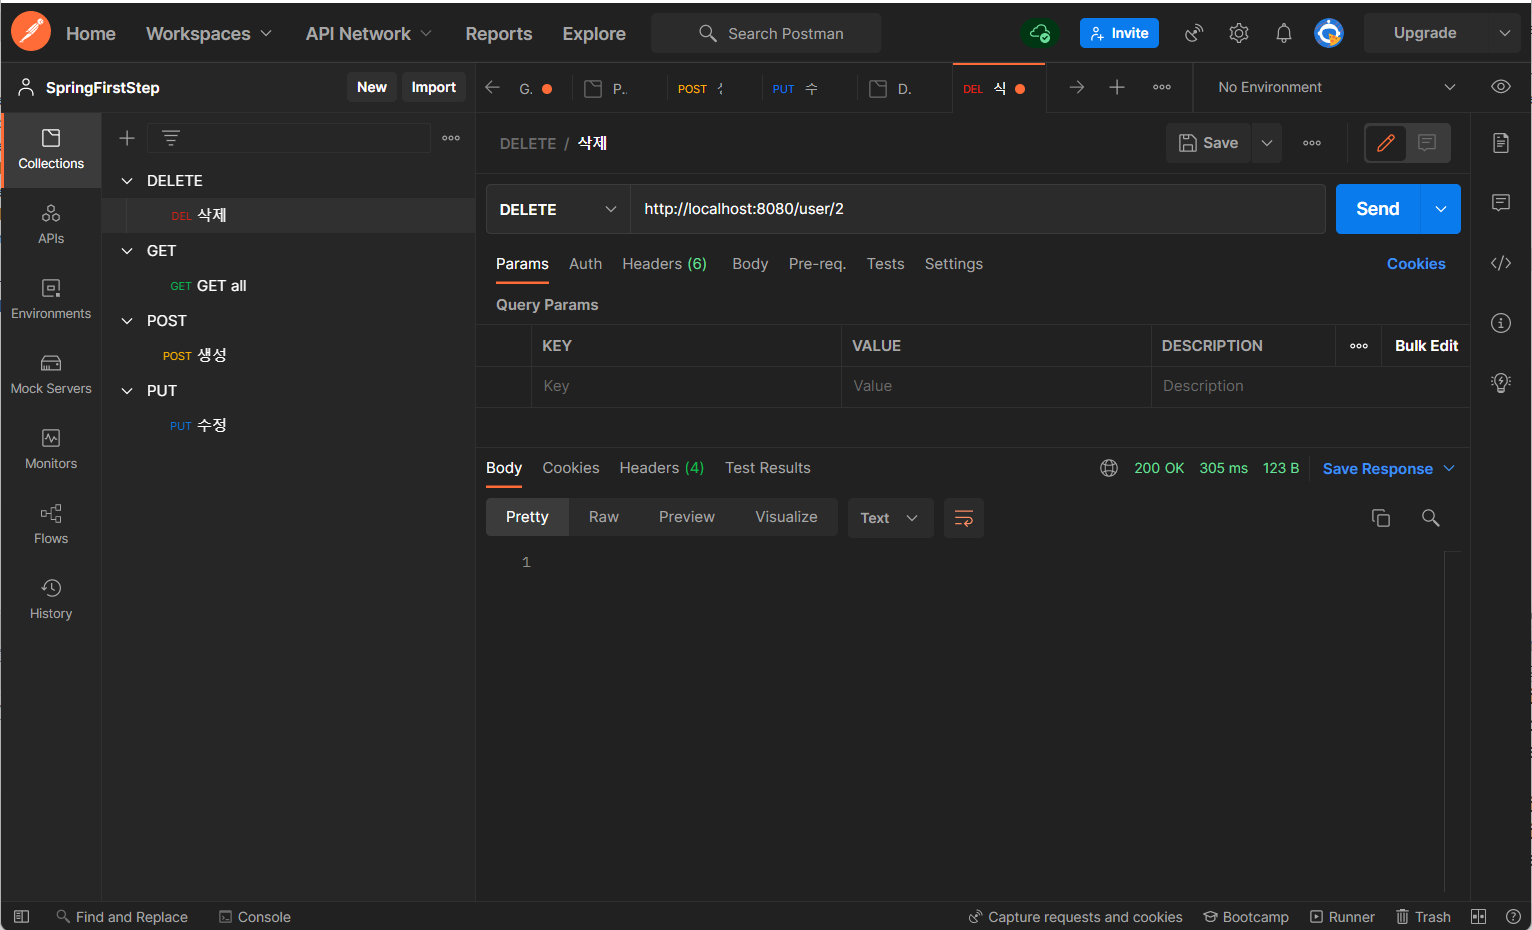
200 OK~ GET으로 확인
2번 회원이 삭제 되었다!!
이렇게 GET, POST, PUT, DELETE 모두 사용해봤다.
Controller 전체코드
UserProfileController.java
package com.example.demo.controller;

import java.util.ArrayList;
import java.util.HashMap;
import java.util.List;
import java.util.Map;

import javax.annotation.PostConstruct;

import org.springframework.web.bind.annotation.DeleteMapping;
import org.springframework.web.bind.annotation.GetMapping;
import org.springframework.web.bind.annotation.PathVariable;
import org.springframework.web.bind.annotation.PostMapping;
import org.springframework.web.bind.annotation.PutMapping;
import org.springframework.web.bind.annotation.RequestParam;
import org.springframework.web.bind.annotation.RestController;

import com.example.demo.model.UserProfile;

@RestController
public class UserProfileController {

	private Map<String, UserProfile> userMap;

	@PostConstruct
	public void init() {
		userMap = new HashMap<String, UserProfile>();
		userMap.put("1", new UserProfile("1", "홍길동", "111-1111", "서울시 강남구 대치1동"));
		userMap.put("2", new UserProfile("2", "홍길지", "111-1112", "서울시 강남구 대치2동"));
		userMap.put("3", new UserProfile("3", "홍길순", "111-1113", "서울시 강남구 대치3동"));
	}

	@GetMapping("/user/{id}") //이러한 경로로 받음. 파라미터로 id값을 받을 것. //id를 받아 UserProfile을 반환하는 메서드.
	public UserProfile getUserProfile(@PathVariable("id") String id) {  //메서드의 인자로 id라는 변수를 받을 건데 이 값은 path에 있음을 의미.
		return userMap.get(id); //id값을 이용해 UserProfile반환
	}

	@GetMapping("/user/all")
	public List<UserProfile> getUserProfileList() {
		return new ArrayList<UserProfile>(userMap.values()); //values()는 해당 Map의 키값과 밸류값들을 반환하는 메서드. userMap의 키값과 밸류값들을 arrayList로 변환해서 반환
	}

	//데이터 생성
	@PostMapping("/user/{id}") //통상적으로 Path에는 id와 같은 한두가지 파라미터 전달만 사용함. 일반적인 경우 RequestParam을 사용해 http프로토콜의 파라미터로 전달함
	//메서드의 인자로 id, name, phone, address변수를 받을 건데 그 인자는 path또는 http파라미터에 있음.
	public void postUserProfile(@PathVariable("id") String id, @RequestParam("name") String name, @RequestParam("phone") String phone, @RequestParam("address") String address) {
		UserProfile userProfile = new UserProfile(id, name, phone, address);
		userMap.put(id, userProfile);
	}

	//데이터 수정
	@PutMapping("/user/{id}")
	public void putUserProfile(@PathVariable("id") String id, @RequestParam("name") String name, @RequestParam("phone") String phone, @RequestParam("address") String address) {
		UserProfile userProfile = userMap.get(id);
		userProfile.setName(name);
		userProfile.setPhone(phone);
		userProfile.setAddress(address);
	}

	//데이터 삭제
	@DeleteMapping("/user/{id}")
	public void deleteUserProfile(@PathVariable("id") String id) {
		userMap.remove(id);
	}
}서버는 1도 몰랐던 내가
CRUD 기능을 모두 만들어보았다.
실제 서버로 활용하기 위해
다음에는 DB를 연결해서 서버가 꺼져도 데이터를 유지하도록 해보자!
[Spring] 스프링 부트 첫걸음 3 : REST API에 데이터베이스 연동 (MySQL, MyBatis)
[Spring] 스프링 부트 첫걸음 3 : REST API에 데이터베이스 연동 (MySQL, MyBatis) ** 해당 글은 하단 참고란의 영상을 보고 따라서 공부하며 기록한 글입니다. 이전글과 이어집니다. [Spring] 스프링 부트 첫
onedaythreecoding.tistory.com
참고 https://www.youtube.com/watch?v=nrxzK_ky3uc&list=PLvdZg8T1CFZuMZh5PzNUAhDprr0ksjkNp&index=1